The kitchen is the most used room in any home and the most complex to remodel. Plumbing, electrical, cabinetry, appliances, and flooring all move at the same time, and when any one of those pieces is not properly planned, the entire project feels it. Budget overruns and schedule delays in kitchen remodeling almost always trace back to one root cause: decisions made during construction that should have been made during planning.
This guide walks you through every stage of kitchen remodel planning in the right order. Before we get into it, if you are already looking for experienced kitchen contractors in the Valley Stream area, Brizzy Contracting and Cleaning Services is ready to help you move from planning to execution the right way.
What to Do Before Remodeling Your Kitchen
Most homeowners jump straight to browsing cabinet styles and countertop materials. That is the fun part, and it is also where a lot of projects go sideways. Before any of that, there is groundwork to lay.
Assess Your Current Kitchen Honestly
Walk into your kitchen and look at it critically. Not as the space you have learned to work around, but as someone seeing it for the first time. A few things worth evaluating honestly:
- Cabinet condition: are the boxes structurally sound or are you dealing with water damage and warping
- Layout efficiency: does it actually work for how you cook, or have you just adapted to its limitations
- Plumbing and electrical: older Long Island homes often have outdated systems that will need attention regardless of how cosmetic you want the remodel to be
- Flooring and walls: surface issues versus deeper moisture or structural problems underneath
Define How You Actually Use Your Kitchen
A kitchen designed for someone who meal preps five nights a week looks completely different from one designed for someone who mostly entertains on weekends. Think about how many people cook at the same time, whether you need island seating, how much storage you genuinely use, and whether the kitchen needs to flow into a living or dining area. These answers directly shape layout, lighting, and storage decisions.
Set Your Priorities Before You Set Your Budget
Write a wants versus needs list before any budget conversation happens. Needs are non-negotiable: counter space, functional storage, updated plumbing. Wants are the things that would be great but will not break the remodel if they do not make the final cut. When numbers get tight later, this list means you make informed tradeoffs instead of reactive ones.
Step 1: Set a Realistic Budget for Your Kitchen Remodel
Budget conversations are uncomfortable, but having them early is what keeps a kitchen remodel from becoming a financial stress. The homeowners who struggle most are not always the ones with smaller budgets. They are the ones who go in without a clear number and no understanding of real costs.
Understanding the True Cost Range for Long Island Kitchen Renovations
Kitchen remodel costs on Long Island vary widely depending on scope, materials, and the condition of the existing space:
- Minor refresh (new cabinet fronts, countertops, fixtures): $15,000 to $30,000
- Mid-range remodel (new cabinetry, appliances, flooring, updated systems): $40,000 to $80,000
- Full gut renovation with layout changes and custom finishes: $100,000 and above
Labor costs in the New York metro area run higher than national averages, so going in with locally grounded expectations matters.
The 30 Percent Rule and When It Applies
The 30 percent rule suggests your kitchen renovation should not exceed 30 percent of your home’s current market value. It is a useful guardrail for resale-focused homeowners. If you plan to stay in your home long term, the value you get from daily use may outweigh the resale math entirely. Use it as a reference point, not a strict limit.
How to Build a Contingency Fund Into Your Budget
Unexpected costs in kitchen remodeling are the norm, not the exception. Older Long Island homes regularly reveal outdated wiring, corroded pipes, or water damage once walls come down. Set aside 15 to 20 percent of your total budget as a contingency before the project starts.
Where to Spend and Where to Save
Spend more on cabinetry, countertops on high-use surfaces, and professional installation for plumbing and electrical work. Save on cabinet hardware, backsplash tile, and lighting fixtures, where mid-range options often perform just as well as premium ones.
Practical tip: Get at least three detailed quotes from licensed contractors before finalizing any budget number. Understanding why quotes differ is as important as the numbers themselves.
Step 2: Choose the Right Kitchen Layout for Your Space
Layout is the foundation of a functional kitchen. You can have the most beautiful cabinetry and the finest appliances, but if the layout does not work for how you actually move and cook, the space will frustrate you every single day. Getting this right before anything is ordered or installed is one of the most important decisions in the entire remodel.
The Most Common Kitchen Layouts and Who They Work Best For
Each layout has strengths that suit different spaces and lifestyles:
- U-shape: Three walls of cabinetry and work surface. Works well for serious cooks who want maximum storage and counter space. Common in larger Long Island homes with dedicated kitchen rooms.
- L-shape: Two adjoining walls, leaving the rest of the space open. Flexible and popular in open-plan homes. Works for both small and mid-size kitchens.
- Galley: Two parallel walls facing each other. Highly efficient for cooking but less social. A practical choice when square footage is limited.
- Island layout: Typically built around an L-shape or U-shape with a freestanding island added. Great for entertaining, additional prep space, and casual seating.
- One-wall: All cabinetry and appliances along a single wall. Best for smaller spaces or open-plan layouts where the kitchen shares square footage with a living or dining area.
The Kitchen Work Triangle and Why It Still Matters
The kitchen work triangle connects the three most used points in any kitchen: the refrigerator, the sink, and the stove. The principle is simple. The shorter and more unobstructed the path between these three points, the more efficiently the kitchen functions during cooking.
It is an older concept but it holds up. When reviewing any layout, check whether these three points form a reasonable triangle without major traffic crossing through the middle of it. Islands and peninsulas that interrupt the triangle are one of the most common layout mistakes in kitchen remodels.
The 60-30-10 Rule for Kitchen Design Balance
The 60-30-10 rule is a design proportion guideline that applies well to kitchens. Sixty percent of the visual space should be a dominant color or material, typically the cabinetry or walls. Thirty percent is a secondary element such as countertops or a contrasting lower cabinet color. Ten percent is the accent, usually hardware, lighting fixtures, or a backsplash.
Following this proportion keeps the kitchen feeling cohesive and intentional rather than busy or visually overwhelming. It is a useful reference when finalizing material and color selections later in the planning process.
Layout Considerations Specific to Long Island Homes
Long Island homes, particularly those built between the 1950s and 1980s, were not designed with open-plan kitchens in mind. Many have load-bearing walls separating the kitchen from the dining or living area, which makes layout changes more complex and more expensive than they appear on paper.
Before committing to any layout that involves moving walls, a structural assessment is essential. It determines what is possible, what requires additional engineering work, and what the real cost of that change looks like. Homes in Valley Stream, Lynbrook, and surrounding Nassau County communities often share similar construction patterns, so this is a step worth taking seriously before finalizing any design.
Step 3: Plan Your Kitchen Renovation Steps in Order
Sequence matters more in a kitchen remodel than in almost any other room. Each trade depends on the one before it. When steps happen out of order, you end up with flooring installed before plumbing is roughed in, or cabinets set before electrical is inspected. These mistakes mean tearing out finished work, which costs time and money that no contingency fund fully covers.
Here is the correct order and why each phase happens when it does.
Demolition and Structural Work
Everything starts here. Existing cabinets, flooring, drywall, and fixtures come out first. If the layout is changing and walls are being moved or removed, structural work happens at this stage too. Any surprises hiding behind walls or under floors get discovered now, which is exactly why the contingency fund from Step 1 exists.
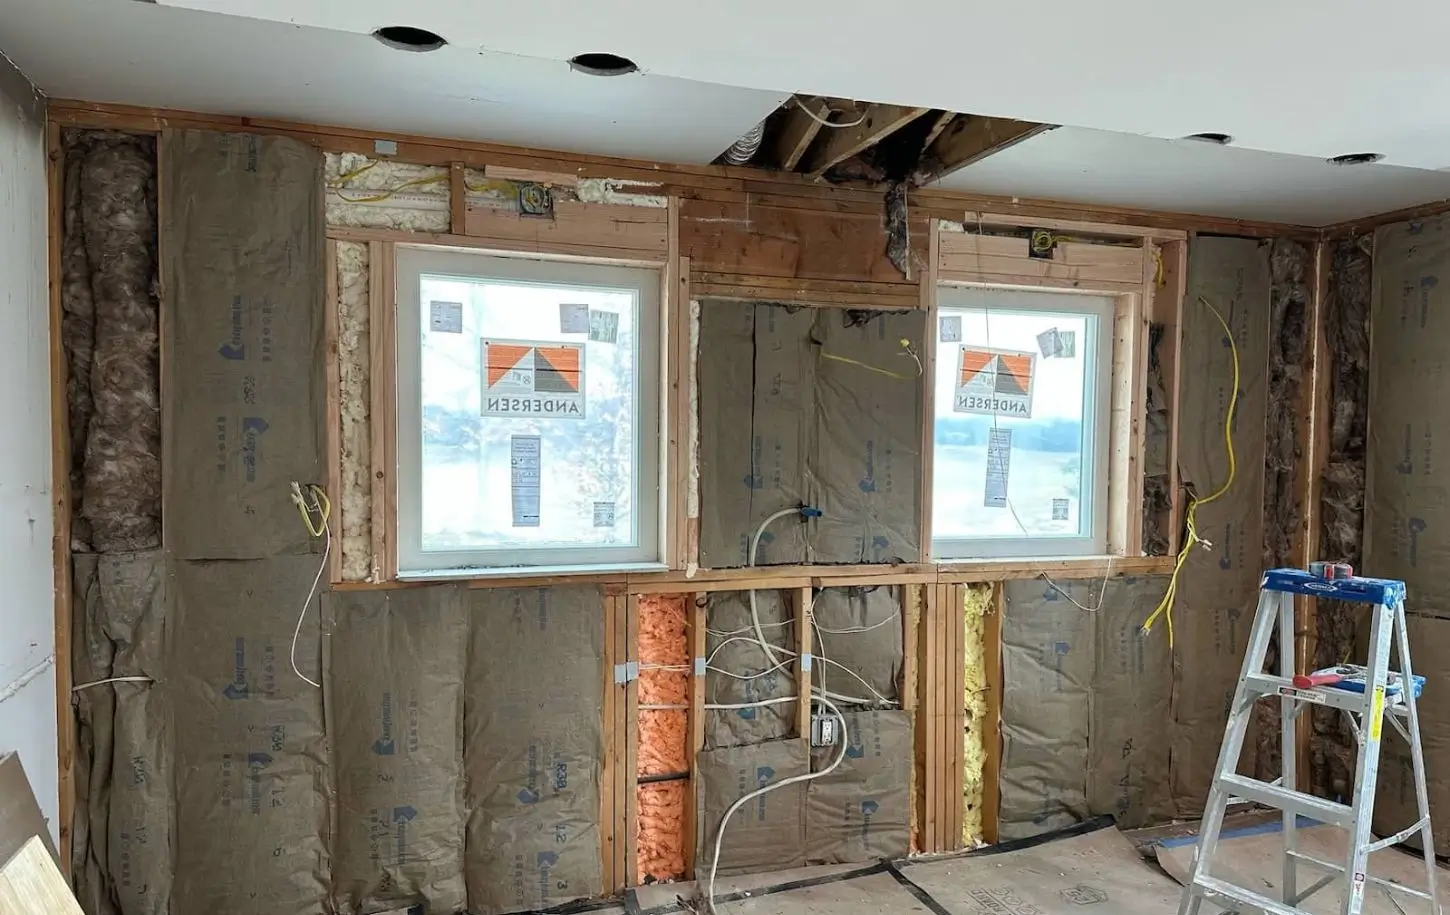
Rough-In Work: Plumbing, Electrical, and HVAC
Once the space is stripped back, the mechanical trades move in:
- Plumbers rough in new drain lines and water supply runs
- Electricians install new circuits, relocate outlets, and run wiring for appliances and lighting
- HVAC work including range hood ventilation gets handled at this stage
None of this is visible in the finished kitchen, but it is the most consequential work in the entire project. Cutting corners here creates problems that surface years later.
Inspections and Permits
Permits are required for most kitchen remodels involving plumbing, electrical, or structural changes in Nassau County. Inspections happen at specific phases, often after rough-in work is complete and before walls are closed.
Skipping permits might seem like a way to save time. In reality it creates serious problems when selling the home, filing an insurance claim, or dealing with any future renovation. Work with a contractor who pulls permits as a standard part of the process.
Cabinetry and Countertops Installation
With rough-in work inspected and walls closed, cabinetry goes in next. Cabinets need to be perfectly level and plumb because everything that follows references their position. Countertops are templated and fabricated after cabinets are installed. For stone surfaces like quartz or granite, expect a lead time of one to two weeks between templating and delivery.
Flooring Installation
Flooring typically goes in after cabinetry. This protects the floor finish during heavier installation work and allows cabinetry to be set at the correct height relative to the subfloor. For hardwood flooring that runs into adjoining rooms, the sequence may shift slightly. Your contractor should confirm the right approach for your specific materials.
Appliance Installation and Finish Work
With cabinetry, countertops, and flooring complete, appliances get installed and connected. This phase also includes:
- Drywall finishing and priming
- Painting walls and ceilings
- Connecting built-in appliances to roughed-in plumbing and electrical
Final Touches: Hardware, Lighting, Backsplash, and Paint
The last phase is where the kitchen comes together visually:
- Cabinet hardware gets installed
- Light fixtures are connected and mounted
- Backsplash tile is set and grouted
- Final paint touch-ups are completed
These feel like small details but they take longer than most homeowners expect. Rushing the final phase is one of the most common mistakes at the end of a remodel. The project feels so close to done that shortcuts seem harmless. They rarely are.
Step 4: Build Your Kitchen Remodel Timeline by Phase
One of the most common frustrations in kitchen remodeling is a project that drags on far longer than expected. It happens because the timeline was never realistically built in the first place.
How Long Does a Kitchen Remodel Take From Start to Finish
It depends on scope. A minor refresh can wrap up in two to three weeks. A mid-range remodel typically runs six to twelve weeks. A full gut renovation in a Nassau County home can take four to six months from demolition to final walkthrough. Most homeowners also underestimate the pre-construction phase. Cabinets alone can carry lead times of six to ten weeks depending on the manufacturer.
Timeline Breakdown by Scope
| Phase | Minor Refresh | Mid-Range Remodel | Full Gut Renovation |
|---|---|---|---|
| Planning and Design | 1 to 2 weeks | 3 to 5 weeks | 6 to 10 weeks |
| Permits and Approvals | Minimal | 2 to 4 weeks | 3 to 6 weeks |
| Demolition | 1 to 2 days | 3 to 5 days | 1 to 2 weeks |
| Rough-in Work | Minimal | 1 to 2 weeks | 2 to 3 weeks |
| Cabinetry and Countertops | 1 to 2 weeks | 2 to 4 weeks | 3 to 5 weeks |
| Flooring and Finishes | 3 to 5 days | 1 to 2 weeks | 2 to 3 weeks |
| Total Estimated Duration | 2 to 4 weeks | 6 to 12 weeks | 4 to 6 months |
What Causes Delays
- Material lead times, especially for cabinets and countertops
- Permit processing timelines in Nassau County
- Hidden conditions discovered during demolition
- Mid-project design changes
- Scheduling gaps between trades
How to Avoid Scheduling Gaps
Order materials before demolition begins. Confirm each trade’s availability before the phase preceding theirs wraps up. Keep one point of contact accountable for the full schedule. At Brizzy Contracting and Cleaning Services, we manage full trade coordination so Long Island homeowners are not left chasing contractors on their own.
Step 5: Hire the Right Kitchen Contractor
The contractor you choose shapes everything about how your remodel runs and what the finished result looks like. On Long Island, verify that anyone you hire is licensed and insured in New York, has specific experience with kitchen remodels, and pulls permits as a standard part of their process.
For a detailed breakdown of what to look for and what questions to ask before signing, read our full guide on how to choose a home remodeling contractor.
Step 6: Prepare Your Home and Family for the Remodel
A kitchen remodel does not just affect one room. It disrupts the entire household for weeks, sometimes months. Preparing for that reality before demolition begins makes the process significantly more manageable.
Setting Up a Temporary Kitchen
Before demo day, set up a functional temporary kitchen somewhere else in the home. A folding table, a microwave, a coffee maker, and a mini fridge cover the basics. Stock up on easy meals and paper plates for the first few weeks. It sounds minor but having a plan here prevents a lot of daily frustration.
Protecting the Rest of Your Home
Construction dust travels further than most people expect. Seal off the kitchen doorway with plastic sheeting, lay down floor protection in hallways and adjoining rooms, and ask your contractor how they manage dust containment during demolition. A good contractor addresses this without being asked.
Communicating the Timeline With Your Household
Everyone living in the home needs to understand what to expect and when. Which areas will be off limits, how long each phase runs, and what the noisiest or most disruptive days look like. This is especially important for households with young children, remote workers, or anyone with a sensitive schedule.
Shopping for Appliances and Materials Early
This one cannot be overstated. Order appliances, cabinets, countertop materials, and flooring before demolition begins. Lead times on Long Island can run longer than expected, and a delayed cabinet delivery can stall every trade that follows. Early ordering keeps the project moving on schedule.
Kitchen Remodel Planning Checklist
Use this checklist to stay organized from the first planning conversation to the day construction begins. A well-prepared homeowner is the single biggest factor in keeping a kitchen remodel on schedule and on budget.
- Define your goals and non-negotiables before any design conversations begin
- Set a realistic budget and add a 15 to 20 percent contingency fund
- Write a wants versus needs list to guide tradeoff decisions later
- Choose your layout and finalize the design with your contractor
- Hire a licensed and insured contractor with verified Long Island experience
- Confirm that permits will be pulled before any work begins
- Order cabinets, appliances, countertops, and flooring well in advance
- Confirm the full renovation sequence in order with your contractor before demo day
- Set up a temporary kitchen space before demolition begins
- Protect adjoining rooms from dust and debris during construction
- Plan for inspections at each required phase of the project
- Keep one point of contact accountable for trade scheduling throughout
Frequently Asked Questions
How Do You Plan a Kitchen Remodel Step by Step?
Start by assessing your current kitchen and defining how you use the space. Set a realistic budget with a contingency fund, choose the right layout, and finalize your design before ordering anything. From there, hire a licensed contractor, pull permits, and follow the renovation sequence in the correct order from demolition through to final finishes.
In What Order Should You Renovate a Kitchen?
The correct sequence is demolition, structural work, rough-in plumbing and electrical, inspections, cabinetry, countertops, flooring, appliance installation, and final finishes. Each phase depends on the one before it. Skipping or reordering steps leads to rework that costs both time and money.
How Long Does a Kitchen Remodel Take?
A minor refresh typically takes two to four weeks. A mid-range remodel runs six to twelve weeks. A full gut renovation in a Long Island home can take four to six months. Pre-construction planning, material lead times, and permit processing all add time before demolition even begins.
What Is the 30 Percent Rule in Remodeling?
The 30 percent rule suggests that your kitchen renovation budget should not exceed 30 percent of your home’s current market value. It is a useful guideline for homeowners focused on resale value. If you plan to stay in your home long term, the daily value of a well-functioning kitchen may matter more than the resale calculation.
What Is the 60-30-10 Rule for Kitchens?
It is a design proportion guideline. Sixty percent of the visual space should be a dominant material or color, typically cabinetry. Thirty percent goes to a secondary element like countertops. Ten percent is the accent, usually hardware, lighting, or backsplash. Following this proportion keeps the kitchen feeling cohesive and intentional.
Do I Need Permits for a Kitchen Remodel in New York?
Yes, in most cases. Any kitchen remodel involving plumbing changes, electrical work, or structural modifications requires permits in Nassau County and across New York State. Working without permits creates problems when selling your home or filing insurance claims. A reliable contractor pulls permits as a standard part of the process.
What Should I Do Before Remodeling My Kitchen?
Assess your current kitchen honestly, define how you use the space, and write a clear wants versus needs list. Set your budget with a contingency fund, choose your layout, and order materials well before demolition begins. Setting up a temporary kitchen space and protecting the rest of your home from dust are also important steps before work starts.
How Do I Find a Reliable Kitchen Contractor on Long Island?
Look for a contractor who is licensed and insured in New York, has direct experience with kitchen remodels specifically, and pulls permits as part of their standard process. Ask for references from completed projects, get at least three detailed quotes, and pay attention to how clearly they communicate during the estimate process. Clear communication before the project starts is usually a strong indicator of how the project itself will run.
Conclusion
A successful kitchen remodel starts long before demolition day. Define your goals, set a realistic budget, choose the right layout, follow the renovation sequence in order, and prepare your household before work begins. These steps are what separate a smooth, well-executed project from one that runs over budget and over schedule.
Brizzy Contracting and Cleaning Services has helped Long Island homeowners plan and execute kitchen renovations across Nassau County for years. If you are ready to move forward, connect with trusted home remodeling contractors Valley Stream NY for a free on-site consultation and estimate.