Planning a bathroom renovation might feel overwhelming, but having a clear roadmap makes all the difference. In this guide, you’ll learn how to set a realistic budget, choose the right layout, select durable materials, and avoid common mistakes that add time and cost. We’ll cover each step of the bathroom remodel process, from design and demolition to finishes and final touches.
Following this plan can save you money, prevent DIY errors, and help you work smoothly with a contractor. Whether you’re updating a small powder room or a master bath, our remodeling services Lynbrook can provide expert guidance to turn your outdated bathroom into a functional, stylish space that fits your lifestyle.
Your Bathroom Remodeling Complete Guide
A successful bathroom remodel starts with a clear plan. Knowing what to inspect, budget, and prioritize before the work begins can save time, money, and stress. The following steps cover everything from assessing your current bathroom to maximizing comfort and longevity. Use this roadmap as a guide to stay organized, avoid common pitfalls, and make decisions that balance resale value with your personal enjoyment.
Step 1 – Assess Your Current Bathroom
Start by taking a careful look at your bathroom as it is now. Note the layout, check for any signs of water damage, and inspect plumbing and electrical systems. Pay attention to uneven floors, leaky faucets, or outdated wiring as these issues can become bigger problems if left unaddressed. A simple walkthrough often shows what truly needs to be replaced and what can be refreshed with cosmetic updates.
Consider what will give you the most value. Some upgrades are purely functional, like replacing old pipes or fixing drainage, while others focus on personal enjoyment, such as a new tile pattern or vanity. Homeowners often balance return on investment with daily comfort. Features like a stylish shower or heated floor can make a bathroom feel completely renewed, even if they do not dramatically increase resale value. Planning with both function and enjoyment in mind helps guide the renovation.
Step 2 – Set Your Budget
Knowing your budget early makes the renovation smoother and prevents surprises. Include all costs from labor and materials to permits, and always set aside a buffer for unexpected issues, especially in older homes. Focus on quality and functionality over trends, and decide what work you can handle yourself versus what requires a professional.
- Calculate labor costs for contractors, plumbers, and electricians
- Include material costs for tiles, countertops, vanities, and fixtures
- Factor in permit fees and inspection costs for compliance
- Add a contingency of 10 to 20 percent for hidden repairs or delays
- Prioritize essential upgrades over purely aesthetic changes
- Decide which tasks you can do yourself and which need a licensed professional
For more detailed cost guidance, check our home remodel cost blog.
Step 3 – Define Your Goals and Style
Start by thinking about how you want your bathroom to feel and function. Consider the overall style, color palette, and finishes that match your home and personal taste. This early decision will guide material and fixture choices and make the rest of the renovation feel cohesive.
According to Research and Markets, the bathroom remodeling market is expected to reach approximately USD 574.1 Billion by 2034, rising at a CAGR of 3.70%. This growth shows strong demand for practical and long-lasting bathroom designs, making careful planning essential.
Separate your must-have features from the nice-to-have extras. Essentials might include a functional vanity, a comfortable shower, or proper lighting, while optional upgrades could be heated floors, a bidet outlet, or a built-in shower bench. Knowing the difference helps you stay on budget without sacrificing comfort.
Avoid chasing trends that might look dated in a few years. Instead, focus on timeless finishes, durable materials, and layouts that maximize space. A practical, long-lasting design not only makes daily use easier but can improve resale value down the line.
Step 4 – Plan Your Layout & Storage
Think about how each fixture will fit in your space. Where the shower, tub, toilet, and vanity go can make a small bathroom feel cramped or open and inviting. Take measurements and make a rough sketch before buying anything.
Don’t forget the little things that make a big difference. Plan for towel rods, shelves, and grab bars while the walls are open. It’s much easier to add them during a remodel than trying to retrofit later.
For smaller bathrooms, every inch counts. Use vertical storage with shelves or cabinets above the toilet, choose a floating vanity to free up floor space, and consider recessed niches in the shower to keep bottles and toiletries organized. Clever storage can make even the tiniest bathroom feel roomy and functional.
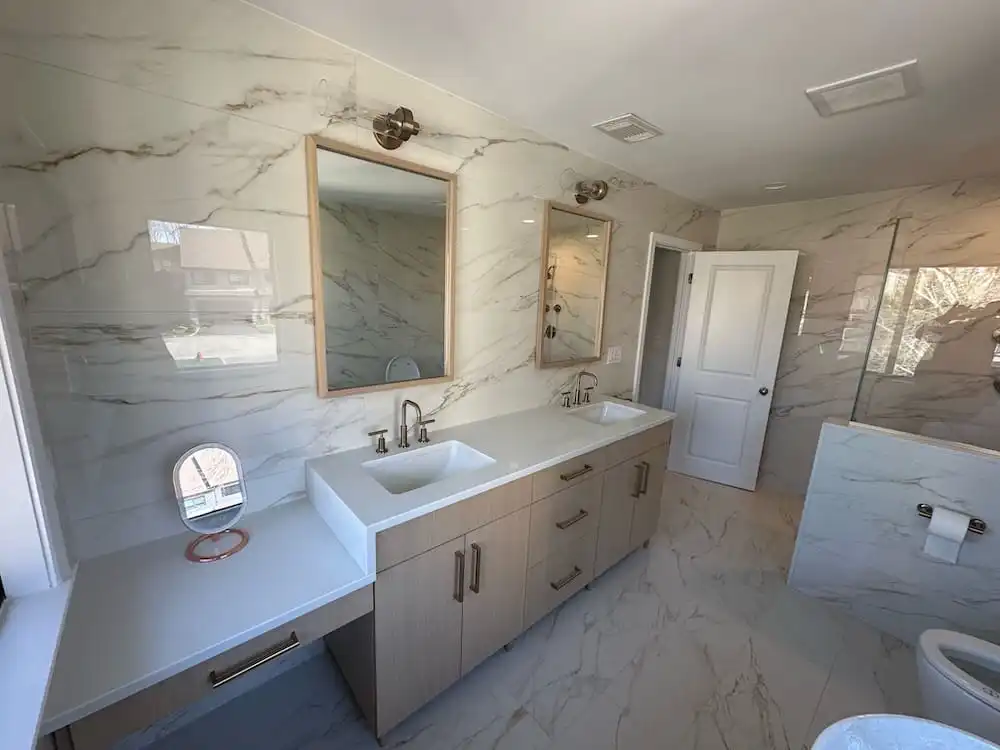
Step 5 – Choose Materials, Fixtures & Finishes
Pick materials that last and match the style you want. Tiles, countertops, vanities, faucets, mirrors, and lighting all shape the look and feel of your bathroom. Think about durability, ease of cleaning, and how each choice works with your plumbing and layout. Some features may look good but create headaches if they don’t fit your space or plumbing.
Consider adding a few upgrades for comfort without going overboard. Luxury features like heated floors, hand showers, or dual shower heads can make a big difference for daily use. Focus on quality where it matters most to avoid future repairs.
Tips to keep in mind:
- Choose vanities that won’t interfere with plumbing or drawers.
- Waterproof shower pans prevent leaks and water damage.
- Durable tile and solid surface countertops last longer in wet areas.
- Include lighting and mirrors that complement both function and style.
- Optional upgrades: heated floors, hand showers, dual shower heads for extra comfort.
Step 6 – Hire the Right Professionals
Finding the right team makes a huge difference. Look for licensed and insured contractors, including a plumber, electrician, tiling pro, and a general contractor who can oversee the project. For tips on choosing the perfect team, check out our guide on how to choose a home remodel contractor. Clear communication upfront about your expectations and priorities helps avoid misunderstandings later.
Pay attention to how work is progressing. Consider paying in stages as milestones are completed, holding the final payment until you’re fully satisfied. Remember that aiming for perfection can slow things down. Balancing quality with steady progress keeps your renovation on track without unnecessary delays.
Step 7 – Plan the Timeline
Setting a clear timeline helps keep your bathroom renovation on track and avoids frustration. Most full renovations take about six to eight weeks, though smaller updates may finish in three to four weeks. Older homes often need extra time for unexpected repairs, so always build in a buffer.
A practical sequence keeps work organized. Start with demolition, then move to plumbing and electrical rough-ins. Once that’s done, install fixtures, vanities, and tile, and finish with paint, mirrors, and accessories. Planning this order ahead makes the process smoother and helps you avoid unnecessary delays.
Step 8 – Demolition and Prep Work
Before you start installing anything new, the old bathroom needs to come out. Remove cabinets, vanities, flooring, and fixtures carefully to avoid damaging walls or plumbing. Once the space is cleared, inspect the subfloor, walls, and plumbing for any hidden issues. Catching problems early saves time and prevents bigger headaches later.
Proper waterproofing is essential, especially around showers and wet areas. Skipping this step can lead to leaks, water damage, and costly repairs.
Quick Notes to Avoid Common Mistakes
- Check walls for plumb and level to prevent wonky tile or fixtures.
- Inspect subfloor for rot, gaps, or uneven surfaces before laying new flooring.
- Make sure plumbing lines are intact and accessible for rough-in work.
- Don’t rush demolition; careful removal protects existing structures.
- Waterproof shower pans and floor before installing tiles or vanities.
Step 9 – Installation Process
Once the prep work is complete, the installation phase begins. Rough-in plumbing, electrical work, and any HVAC updates are handled first. Everything should be carefully placed and tested before walls are closed. Fixing issues now is much easier than after finishes are installed.
After rough-ins, drywall is installed, walls are painted, and tile work begins. Pay attention to layout, mortar, and grout because these details affect both durability and appearance. Starting tile from the center of the room can help create a balanced look. Radiant floor heating adds comfort, especially during colder months.
Finally, the vanity, fixtures, mirrors, lighting, and accessories are installed. Ensure plumbing connections are secure and leak-free. Proper placement of mirrors and lights improves both function and style. Small elements like shelves, towel bars, and shower niches make the bathroom feel complete and practical.
Step 10 – Final Inspection & Walkthrough
Before you wrap up your bathroom renovation, it’s important to inspect everything carefully. Check that plumbing works without leaks, electrical fixtures are functioning, and waterproofing around the shower and floor is solid. Make sure all finishes look clean and even.
Walk through the space as if you were a guest. Confirm that every fixture, light, and accessory works as expected. Taking before and after photos is useful for records and can help when selling your home in the future. It also gives a satisfying view of all the effort that went into the remodel.
What Are Common Bathroom Remodeling Mistakes and How to Avoid Them?
Even small mistakes can cause big headaches in a bathroom remodel. One common issue is picking a vanity without checking if it will interfere with plumbing. Always measure and consider pipe placement before buying.
Skipping waterproofing or rushing corners can lead to water damage and mold later. Ignoring small details like blocking for towel bars, outlet placement, or shower positioning can create frustration down the line. And trying to make everything perfect often slows the project unnecessarily. Focus on quality, but keep the remodel moving forward.
Tips to Maximize Comfort and Longevity
- Install heated floors or bidet outlets for modern comfort.
- Use durable materials such as porcelain tile and solid surface countertops; avoid marble in wet areas.
- Include built-in shelves or shower niches to save space and improve storage.
- Keep the layout maintenance-friendly and easy to clean for long-term convenience.
FAQs
Start by assessing your current bathroom, including layout, plumbing, electrical, and structural conditions. Set a realistic budget, define your goals and style, and decide which features are essential versus optional. Early planning helps avoid delays and costly mistakes.
Ignoring proper layout, skipping waterproofing, underestimating costs, and choosing vanities that interfere with plumbing are common errors. Avoid chasing trends that age quickly and plan storage and fixtures carefully to suit daily family use.
Focus on essential upgrades, choose durable mid-range materials, and include a 10–20 percent contingency for hidden issues. Decide which tasks you can DIY and hire licensed contractors for complex plumbing, electrical, or tile work.
Follow this sequence: demolition, plumbing and electrical rough-in, drywall and painting, tile installation, vanity and fixture placement, then final finishing touches and inspection. Adding buffer time ensures smoother workflow and avoids delays.
Conclusion
Planning a bathroom renovation doesn’t have to be overwhelming. Start by assessing your current bathroom, set a realistic budget, define your style, and plan the layout and storage. Choose the right materials, hire licensed professionals, schedule a practical timeline, handle demolition carefully, oversee the installation, and finish with a thorough inspection. Avoid common mistakes and consider comfort upgrades like heated floors or smart storage.
Thoughtful planning not only saves time and money but also prevents stress and DIY mishaps. If you’re unsure about any step, consulting experienced remodeling contractors long island can make the process smoother and ensure your bathroom remodel turns out exactly as you imagined.